Showing posts with label Creative Paperclay. Show all posts

Saturday, May 8, 2010

Sculpting the Moon


Okay, I forgot to mention it last time, but I'm sure you're way ahead of me and you thought of it yourself: you need to put eyelids on the other eye! Did you do that? If not go ahead and to that, same way as below. Oh, but do look at the eye on the other side so that they relate to each other. They don't have to match exactly (ours don't), but they do have to relate. Our moon probably won't be viewed straight on very much. In fact he'll look a bit funny from that angle, but we still want his eyes to relate. Trust me.


Now that that's done, we'll move on to the chin. Pinch off a chin-sized hunk of clay, and begin to shape it with your fingers. Again, it's sort of a C shape. Put it against your moon to see how it's going to fit and adjust accordingly. When you are happy (or close enough to happy) with it, wet the chin area with your finger and press the chin in place. Smooth the outer edges with your fingers. You'll probably be fine using just your fingers for this step; no details to worry about.


Tuesday, May 4, 2010

The Moon Continues


It's been awhile, but part of the fun of working with Creative Paperclay is that we can come back to it at any time (even years later!) and just pick it up and go on, so lets do it!


It's time for eyelids, upper and lower. We want a wide, C shape, not very thick, for the upper lid. Shape the clay, try it out to see how it fits. You can always cut some away with your X-Acto knife if you have too much. When you're happy with the shape wet the area above the eye with your finger and press the eyelid onto the moon. Use your fingers and tools to smooth the clay and shape it on the eyeball. You want a clean edge on the eye, check you own eyes in a mirror for reference.


Take a smaller piece of clay for the lower lid. The lower lid has a bit of a curve, but it's generally not as pronounced as the upper lid. Keep the clay thin, if it's too thick your moon will have puffy eyes. Again, once you have the clay in a shape you like, wet the area on the moon with your finger, place the clay and smooth it with your tools and fingers. Smooth out the edges of the clay as much as possible so you don't have to fight them later.


The moon has eyelids!


Thursday, April 15, 2010

Who Sculpted the Moon's Nose?


Now, the nose!


Pull a hunk of clay out of the bag. It's going to take a little practice to be able to gauge how much clay you'll need to make a nose for whatever size face you're working on, but not to worry, you can always add or subtract to, or from, whatever you have pulled out! Use your hands to begin shaping your clay into a nose. It's going to be triangular shaped, flat backed, very thin at the top. Again, look at your nose in a mirror if that helps.


Use your finger to wet the nose area on the moon and press the nose onto the space. Smooth out the edges with your fingers. Use your tools to put detail into the nostrils and the flesh around the nostrils.

Who Sculpted the Moon's Nose?


Okay, the nose is done, we'll let it dry!

BUT. Do you see the problem with the eyes? They're not in the right place; too low and at an odd angle. They're sitting where the cheek should be! I'm adding the picture with the odd cropping, it's more obvious in this one. In the next post I'll show you how easy it will be to fix them (the magic of working with Creative Paperclay!).

Wednesday, April 14, 2010

Who Sculpted the Moon?


Hey!


I'm working on a 15" hanging crescent moon, with a face, want to come along?


It's Creative Paperclay over a Styrofoam base. I cut a large circle of Styrofoam into a crescent shape and covered it with a thin coat of clay. I've already put flat-back egg shapes on each side of the crescent in the area where the eyes will be (in fact, these will later become the eyes!).


Oh, by the way, if you haven't worked with Creative Paperclay before you have to keep it in an air tight container. It starts to dry immediately. I use a zip-top baggie; a quart size one holds a pound of clay perfectly. Also when you are adding clay to clay, or clay to any surface for that matter, you must wet the clay (or the surface) first. If it's clay just dampen it, too much water will give the clay a mealy texture.


There are two ways of sculpting the face (or anything for that matter),; you can sculpt one feature at a time, allowing for drying time before adding the next feature; or you can sculpt wet into wet with no drying time between features. There are pros and cons to both methods. The former gives you more control, but it takes longer of course. The latter is more spontaneous, but it is so easy to "mess up" what one has done when one is working on top of wet clay. For this moon we're going to sculpt a feature and allow it to dry before adding another. Since it's two-sided there is too much opportunity to "mess up" what we've already sculpted.


First take out a hunk of clay (reseal the baggie) and start to shape it into an upper lip. If you haven't done much sculpting keep a mirror handy and use yourself as a model. See how your upper lip is shaped. Not just the lip, but from your mouth to your nose, the whole section.


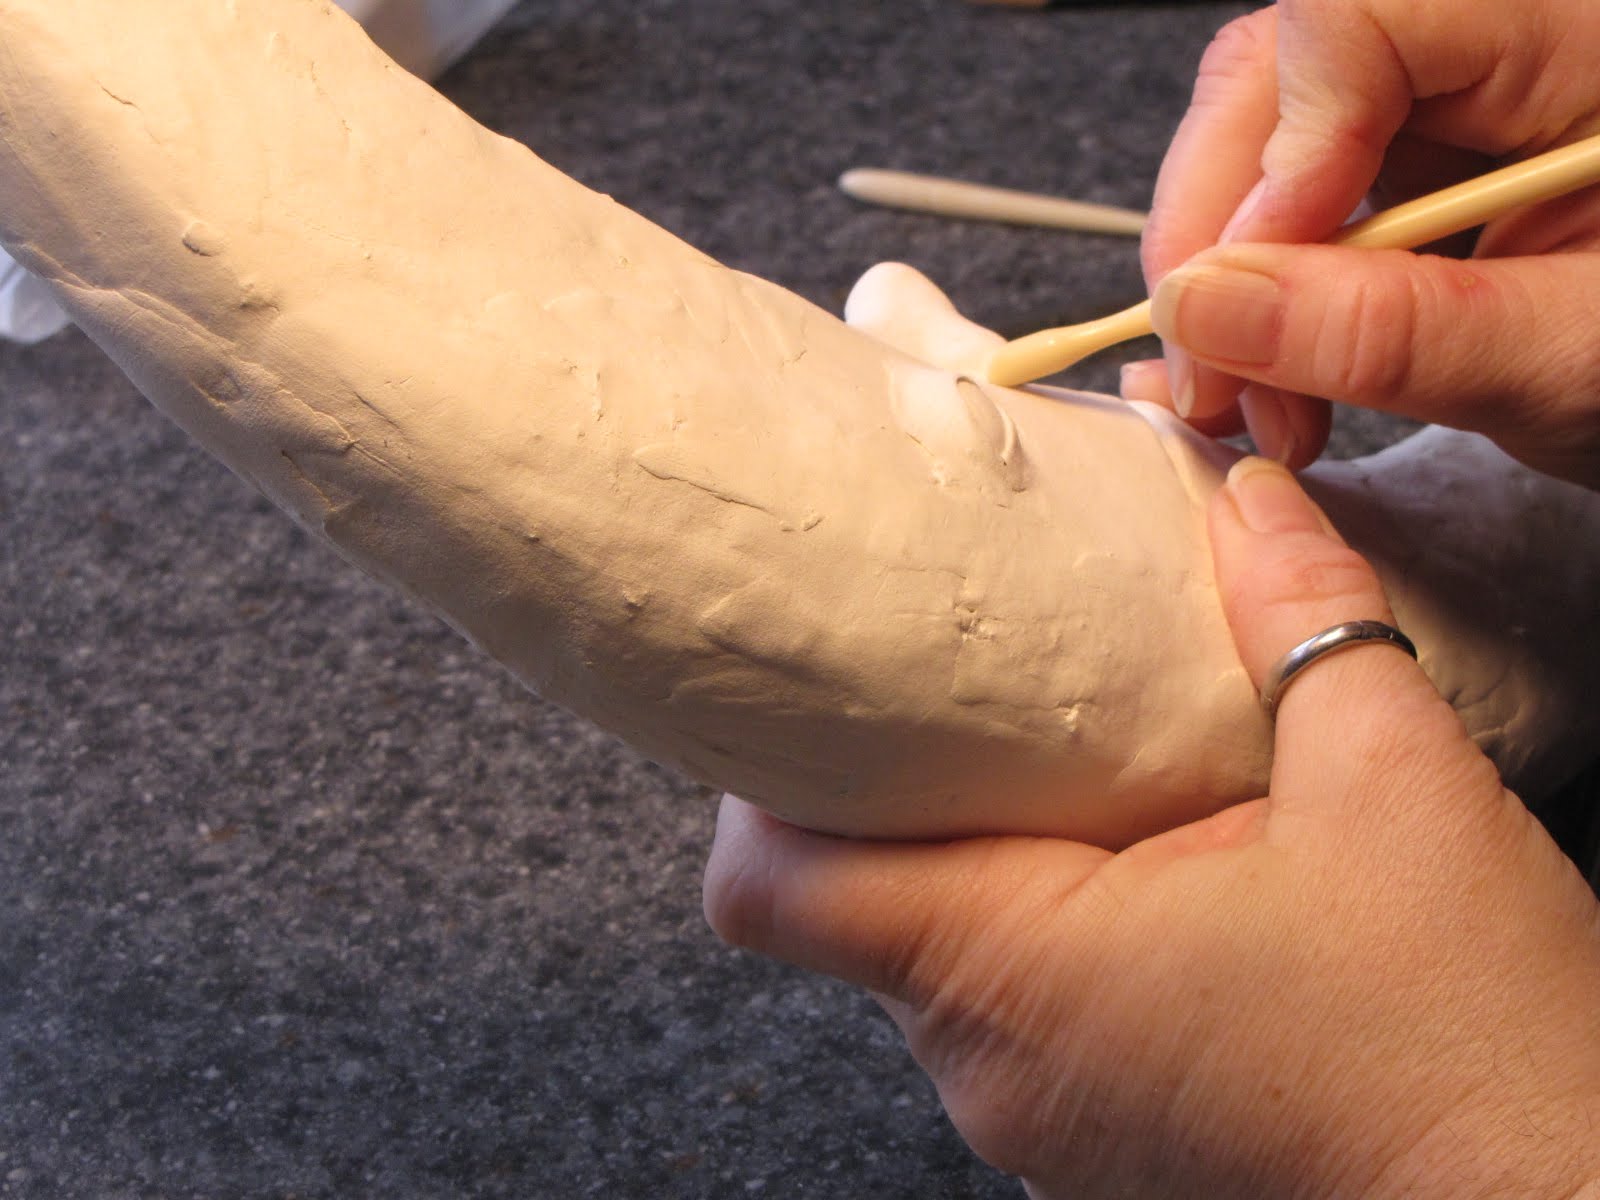
Figure where the lip should go. It's okay to draw the layout of the face on the moon with a pencil if it helps, it won't show when we're done. Dip your finger in water and wet the area where the upper lip is going to go. Press the lip onto the moon and smooth the upper and side edges. Use a tool to shape expression into the lip.


For sculpting I prefer antique manicure tools that I find at antique stores and flea markets. But one can also find good sculpting tools in the clay aisle at Michaels (and other craft stores) or on-line from Dick Blick. You can also get some wonderful handmade tools, for a reasonable price on etsy at http://www.amcreatures.etsy.com/


Now, take another hunk of clay, shape it into a bottom lip. This should include the lip and the face under the lip down to where it meets with the chin. The lower lip will have to follow the shape of the upper lip. Wet the space under the upper lip with your finger and press the lower lip onto the moon, smooth the edges down.


Use your tool to shape the expression. You can change the expression a lot at this stage, but be careful not to overwork it, you'll never get a natural expression if you overwork the mouth. Again, it helps to have a mirror handy so you can check your own lips for expression.


Prop your moon up so it can dry without smashing any of the hard work you've done!


Wednesday, April 7, 2010

Creative Paperclay


It's my favorite medium for sculpting.


Why Creative Paperclay you ask?


What's not to like?


It's easy to work with - It air dries, no kiln, no oven needed.


It's forgiving - You can change what you've done even after it dries, just cut off the part you don't like, wet the area you're going to add new clay to and start over!


It's versatile - It can be sculpted into faces, hands, rocks, walls. It can be draped for cloth. I've made figures ranging in size from 1.5" to 4.5' tall.


But most of all, for me, it's the surface when it's dry; it's just like paper (as the name implies?). I can draw on it with pencil, or paint it with watercolor or acrylic. It can take a wash or heavy coverage with paint, or the white clay can stand on it's own.


I love it. If you haven't tried it I highly recommend it.

Saturday, March 27, 2010

Hello to the morning


First thing in the morning, when the light is soft and the house is quiet, I take my coffee into the studio. I sit and look at what I did the day before and think about what direction today should take. No extra light. No extra sound. It's bliss.

Saturday, February 13, 2010

What to do today.


It's a gray, cold (for Florida) morning and I'm looking at the stuff on and around the work table in my studio. I'm not sure what I want to do today; not feeling ambitious.

There are some bits and pieces that were unearthed during the studio overhaul that could turn into something interesting, perhaps today is the day to start looking at them. Or it could be the day to read a good book.......

Sunday, January 17, 2010

Winter Cleaning


I know, we're supposed to do spring cleaning, not winter cleaning. But since moving to Florida eight years ago winter seems to be a better time to do deep cleaning. It's when the weather's mild - usually - and the windows can be open. It just feels like the right time down here.


I've been doing a bit of winter cleaning in the studio, sorting through shelves and storage bins, weeding out things I can give way or list for sale on etsy.


One happy result of deep cleaning in the studio is rediscovering pieces in various stages of completion that for one reason or another got set aside. Some will pique my interest again and I set them out on my work table. When this happens I rarely finish the piece as I had originally intended; there's a new vision now.


Recently I came across this tiny plate and spoon, along with their equally tiny arms and legs. Originally I had planned on doing a piece depicting the entire "Hey Diddle Diddle" gang, but lately I have been enamoured with small works, so now the dish is going to run away with the spoon alone. I painted the faces and put stripes on the wee arms and legs. Then I wired the extremities to the bodies to give them motion. They'll go on a 3X3" canvas, something else will go on the canvas with them, not sure what yet. I'll have to let you know.


I also ran across this little baby in a hollyhock. He was already painted. In fact the hollyhock was glued to a pinback. Apparently at some point I went though a very strange pin-phase that I'm now blocking...... Anyway, the hollyhock fellow has now been coated with beeswax and attached to a beeswax coated 2.5X3.5" canvas, then wrapped with copper wire. Not sure what else will go on his canvas either, but I'll put both finished pieces in a future post.


In the meantime I'm looking forward to seeing what else I might find in the boxes and bins and what ideas these finds might spark.......


Thursday, December 31, 2009

Blue Moon


There's a Blue Moon tonight. My favorite art work of my own is titled "Blue Moon". It was conceived at the American Craft Council, Sarasota, Florida show, in 2002. My business name was Silver Moon Studio. Across the aisle was a potter who called his business Blue Moon Studio. During the course of the show he explained that he and his wife (and fellow potter) had found their farm in upstate New York, with a pottery studio already built on it, on the day of a blue moon.


I was sitting in my booth thinking about a blue moon being the second full moon in a month when it occurred to me that, no, it would simply be a very sad moon. I did some quick sketches right away and had intended to share them with you, but I have misplaced the sketchbook I was using at the time. Anyway, I did not follow the sketches very closely. I very rarely do. The piece didn't come to fruition right away; I finished him in 2006.


He was sculpted in Creative Paperclay with a wood and wire armature. His clothing was also made of paperclay with acrylic paint and silver leaf. I knew that he would be wear all shades of blue with some purple. I didn't plan on the red tie. It was a last minute decision. It was his choice and it is out of character for him, but he wears it any way because it was a gift from the sun.


"Blue Moon" is living in the Atlanta area. He found a new home when we were there for the American Craft Council Show in March 2008.


Happy New Year!

Wednesday, December 23, 2009

The book completed!


With silhouettes cut from all of the pages it was time to make the book stand.


This proved to be a bit of a challenge. I had drilled dowels into the base thinking I could simply attach chipboard to the dowels and glue the spine of the book to the chipboard. It seemed like a good idea at the time. I applied the glue and held the book in place........and I held the book in place........and I held the book in place........well anyway, I held it a long time, but it didn't matter, the book had gotten too fragile and the spine was disintegrating. The glue held it to the chipboard at the bottom, but not at the top, so the book slumped.


Yikes! The figure couldn't sit on the book if it was slumping. Heck, the silhouettes couldn't even fan out! Time was running out, I needed to get the piece finished in time for the show and I couldn't sculpt the figure until I had the book standing so I could see how its legs would sit on the book. After a few minutes of panicking I decided I might be able to drill a couple of holes through the book, then wire it to the dowels. If you are ever going to drill through a book I recommend doing it while the book is laying down, it will be much easier I'm sure. It wasn't easy, but it worked!!


I had the head and torso and hands of the figure sculpted, now I was able to sculpt the legs and arms in the position I had in mind.


The piece made it to Still Life in G Gallery in the Village of the Arts in Bradenton, Florida in time for the show. I wasn't completely happy with it when I finished, but I ran out of time and I had to stop working on it. It's the base I'm not happy with. I asked people to give me the names of characters they remember from books they've read and I wrote the names, along with the quote on the base, but it's all too pale I think. There's no contrast. Deb McKeever, the owner of the gallery is going to invite visitors to the show to add names to the base. If I'm still unhappy with it when it comes home I can always work on it some more!

Saturday, December 19, 2009

Does Santa have to be dressed in traditional colors?


Blue Santa? Turquoise Santa? Acid green Santa? What do you think, can it really be Santa dressed in these non-traditional colors? After seeing these colors in the stores and in the Christmas issues of several magazines I was inspired to dress this year's troop of Santas in bright, non-traditional colors (you can see how they started life in the July 28th post, "in the studio (at last)"). I listed this group of cheery fellows in my shop on etsy - http://www.olivamoon.etsy.com/ . Only the red one has sold, and it was sold before they were listed on etsy. Now, I admit that I did finish them late, I didn't list them until December 2nd, so I'm unsure if they haven't sold because of the late listing, or if the bright colors don't appeal to people.

So, what do you think, does Santa have to be dressed in traditional colors?

Wednesday, December 16, 2009

The book continues


Wow, it's been a long time since I've written! Time has been flying, I must be having fun.


The sculptural book piece is finished; I'll share it in a later post. It took a lot longer to finish it than I had anticipated, as things often do. While I had the book standing up on end it looked like it wanted a figure to sit on top, that would look down into the pages. I still wanted to do some kind of faces ....SO....I decided to cut silhouettes from the pages of the book.


At this point the question was whether to cut many different silhouettes, or do one silhouette 1200 times (there are 1200 pages in the book). As I was pondering this I thought how many of the characters from the books I read when I was young had stayed with me, I still think of them, some had helped to shape me. I decided to cut many different faces in the book. All 1200 pages. It took a long time. A very long time.

Wednesday, July 29, 2009

more work in progress


This morning I opened the drawer of the flat file to hunt for photos and ephemera to add to the assemblages and the drawer exploded. It was bond to happen sooner or later; it was overstuffed with, well, stuff. I long to be organized, I work to get everything in order, fully intending to keep it that way (I actually believe that I will), but of course it never lasts. In a hurry looking for something I'll riffle through, or coming home from a successful hunt I'll toss new finds in; whatever the cause chaos inevitably returns. Today is the day to reclaim the drawer. I'll let you know what treasures I rediscover.

Tuesday, July 28, 2009

in the studio (at last)


In the studio today after a long (too long) dry spell. Well, not a dry spell really, it was more a matter of not having my priorities straight. So, now I'm trying to keep those priorities in order and make studio time the top one every day (when possible of course). The problem this morning was what to work on; new inspiration, or old project? The answer seems to be a bit of both. I often work with Creative Paperclay and it's best built up in layers, so I added layers to some already-in-progress work. I also started some backgrounds for some small assemblage pieces. This afternoon I'm going to search through my treasure trove of the bits and pieces that have followed me home and see what wants to be part of the assemblages. I think I'm also going to get out the sea glass that we found on the beach in Grand Turk and think about making some souvenirs from our family vacation. I guess that's part of the problem too isn't it? So much inspiration, so little time!


Anne Ross Oliva


olivamoon.etsy.com